Tuesday, May 31, 2011

Merchant's Cart: Framework

Existing Cart Frame

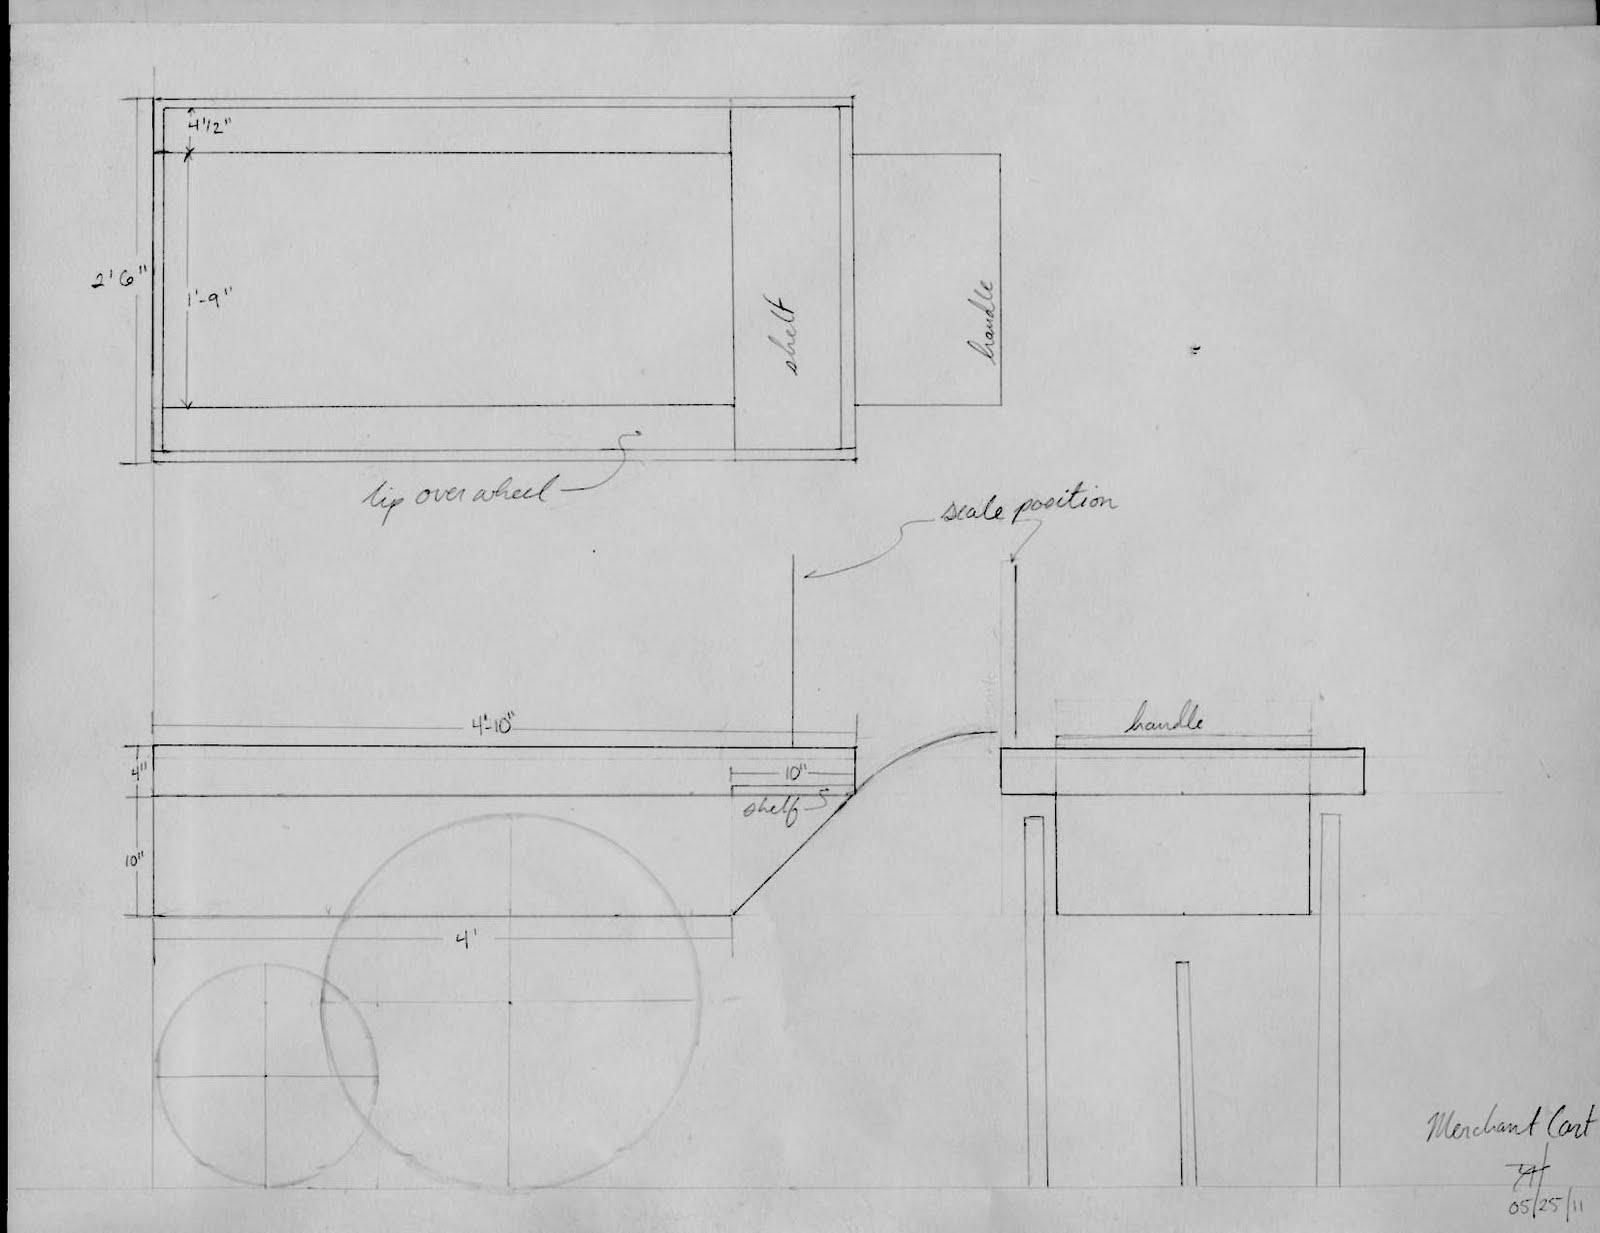
I've now begun construction of the merchant cart for The Merchant of Venice at Shakespeare Theatre Company. We have a very neat old cart frame to work with which presented a few little challenges in order to expand the size of the cart bed.


New Cart Bed

I put together a box for the cart bed built to accommodate the position of the wheels. I think it looks quite a bit like a little row boat still, but it's getting there. The next step is to start altering the box and planning out the layout for the wares.

Thursday, May 26, 2011

Merchant's Cart

Cart Draft

At the prop shop we've been working on the build for "The Merchant of Venice." One of my projects is the construction of the merchandise cart. We have a frame that our designer likes and I have been asked to make the cart body ( a wooden insert ) in such a way that the cart will be larger while still using the existing frame.

Tuesday, May 24, 2011

Seraph Prosthetic Finalized

Seraph Prosthetic Completed

The final step in finishing up the silicone prosthetic was to paint the surface with Psycho Paint and gold casting powder. The base color was a darker gold and the high relief surfaces were highlighted with straight gold.


The piece was finally applied with prosthetic adhesive for fit testing.

(The color of the dress and headdress in the final fit images were digitally altered to match the palette for the Seraph costume design. The prosthetic appears as is.)

Sunday, May 22, 2011

Prosthetic Casting

Seraph Silicone Prosthetic Model and Mold

Demolding the plasticine model was a breeze since I had decided to use a universal mold release spray. The plasticine would not have stuck to the plaster too badly had I forgotten this step, but because I remembered the model came out cleanly. I would be able to touch-up the model and remake the mold if necessary and also didn't have to take much time cleaning up the mold before casting.

Silicone Prosthetic Samples

With the plaster mold cleaned with soap and water and sprayed with universal mold release I was ready to start casting. I did a few quick samples first to figure out the proportion of metallic powders to silicone pigment.

Seraph Silicone Prosthetic Cast #4

Once I'd determined what proportions I needed to get the correct base color I cast the entire piece in one batch. It took four tries to get a successful casting. The first time I did not mix enough to make the whole piece in one batch. The second and third time the silicone was not mixed thoroughly and parts of the casting did not cure properly. With such a small application of silicone in such thin sections it was crucial that the silicone be really thoroughly mixed. I realized I'd forgotten to double pour - this is when the two part of the casting material are poured together and mixed, then poured into a second container and mixed again. This solved the curing issues and the fourth cast was completely successful. The silicone was easily demolded from the plaster mold. The edges were then all trimmed.

Thursday, May 19, 2011

Plaster Mold Making

Seraph Silicone Prosthetic Model in Final Stages

With the last of the carving completed and the hard edges softened with denatured alcohol it was time to make the mold.


Fiber Reinforced Plaster Mold

The material for the mold depends upon both the model material and the casting material. The model was a non-sulfur plasticine which is compatible with just about everything. The casting material was silicone so it made the most sense to make the mold out of a rigid material. I could have used a resin but it was less expensive to just use fiber reinforced plaster - which I already had on hand.

Wednesday, May 18, 2011

Detailed Modeling

Seraph Silicone Prosthetic Model Detail

After the form for the silicone prosthetic was blocked out I began to carve back the excess clay, modeling a more precise outline and smoothing the form. I only carved a small section at first to get an idea where I was heading with it.

Seraph Silicone Prosthetic Left Half

Before I got too far ahead of myself I flipped the design and finished blocking out the other half in clay. I decided to make one complete piece rather than a left and right half. I didn't want the hassle of lining up seams.

Tuesday, May 17, 2011

Plasticine Modeling

Seraph Prosthetic Designs
left: mid process, right: final design


The next step in building the Seraph silicone prosthetic was to sketch out a fully realized design based on the flat pattern.

Seraph Prosthetic Plasticine Model

The design was taped under a piece of plexi on top of which I began to model the prosthetic piece in plasticine clay. When modeling I prefer to start out heavy handed and carve back the excess.

Monday, May 16, 2011

Plastic Wrap Patterning

Plastic Wrap Pattern

The very first step in the making of the Seraph silicone prosthetic was sketching where the major rhythms in the design would be placed on the face. After a number of thumbnail sketches a basic layout was selected. This layout was sketched onto a plastic wrapped mannequin head. The plastic wrap was then taped over with clear packing tape so that the position of the design would stay in place when the plastic was cut off of the form. This enabled me to then make a flat pattern by slashing and spreading the draped plastic.

Saturday, May 14, 2011

Back At It

Seraph silicone appliance

It's high time this blog was back up and running. I'll make an effort to play a bit of catch up posting the most interesting projects that have come and gone over the past several months. But to start with, here's a little something I just finished today.

I've been working on a new costume which may or may not ever be completed. The costume is that of a seraph (6-winged angel - name meaning "fiery one") It is an art nouveau inspired design.


Seraph silicone appliance sketch

I decided to start with building the silicone facial prosthetic since it's the sort of work I haven't done before and new materials are always fun. I figured that even if I don't get to making the rest of the costume I must at least create this piece of it. It all started with a sketch.